This article will show you how to configure encrypted DNS on a Windows 11 machine using PowerShell. If PowerShell scares you, or you don’t feel comfortable using command line, we have another guide using the GUI and PS.
PowerShell needs to be operated in Administrator mode for these commands to work correctly. We have created a simple PS script you can use, or you can take the commands below and inject them into your own script.
🛡️ CleanBrowsing: Internet Safety Made Simple
Filter harmful websites, block adult content, and protect your entire network. All with fast, privacy-respecting DNS.
Start Filtering Here →If you’re wanting to set it automatically programmatically, you have to switch the order slightly from the one in our last article. In this article we will still register the template, but we will set the DNS value first so that when we force encryption its automatically set. We found that if we set encryption before the DNS value is set it won’t and you will have to do it manually again.
Step 1: Set Local DNS
We’re going to use the Set-DnsClientServerAddress cmdlet that will allow us to force DNS:
Set-DnsClientServerAddress Wi-Fi -ServerAddresses ("185.228.168.10")
Above we’re setting the interface to Wi-Fi, set that to whatever interface you have up.
Check what interfaces are available by using the Get-NetAdapter cmdlet.
Step 2: Register the DOH Template
We will be using the Add-DnsClientDohServerAddress cmdlet. You will have to pass two specific options:
- -ServerAddress
- -DohTemplate
It will look like this:
Add-DnsClientDohServerAddress -ServerAddress [ip] -DohTemplate [url]
The DohTemplate is referencing the DOH URL, so if you’re working with CleanBrowsing filters it would be based on DOH url we provider in your dashboard:
Add-DnsClientDohServerAddress -ServerAddress 185.228.168.10 -DohTemplate https://doh.cleanbrowsing.org/doh/custom-filter/[key]/
It will generate an output like this:
ServerAddress  AllowFallbackToUdp AutoUpgrade DohTemplate
-------------  ------------------ ----------- -----------
185.228.168.10 False              False       https://doh.cleanbrowsing.org/doh/custom-filter/[key]/
You can confirm it was registered by running:
netsh dns show encryption
You will see all the DOH templates available to use. Scroll until you see the entry for CleanBrowsing. Should look like this (but with your URL):
Encryption settings for 185.228.168.10
----------------------------------------------------------------------
DNS-over-HTTPS template     : https://doh.cleanbrowsing.org/doh/custom-filter/[key]/
Auto-upgrade                : no
UDP-fallback                : no
Whether using the Free, or Paid, filters, the Server IP for DOH will always be 185.228.168.10. While we support IPv6 DNS, we don’t have it configured for DOH yet. We encourage you disable IPv6 on the machine to avoid leaking DNS queries.
Now that the template is registered, we can set encryption. You are able to find the DOH Well Known Servers for your device by checking registry here: \HKEY_LOCAL_MACHINE\SYSTEM\CurrentControlSet\Services\Dnscache\Parameters\DohWellKnownServers\
Step 3: Force Encryption on DNS
To force encryption we’re going to manipulate the registry keys, but doing so in PowerShell can be a bit more involved than with command prompt. Where we would once use reg add we now have a more involved process.
For this step, we recommend dropping the following into a PowerShell file (i.e., forcedns.ps1) and execute it via PS.
This is what you want in the file:
$RegistryPath = 'HKLM:\System\CurrentControlSet\Services\Dnscache\InterfaceSpecificParameters\{b8c2ef47-639d-4b00-96f4-b8e3c8a30618}\DohInterfaceSettings\Doh\185.228.168.10'
$Name         = 'DohFlags'
$Value        = '1'
# Create the key if it does not exist
If (-NOT (Test-Path $RegistryPath)) {
  New-Item -Path $RegistryPath -Force | Out-Null
}
# Now set the value
New-ItemProperty -Path $RegistryPath -Name $Name -Value $Value -PropertyType QWORD -Force
You wil notice that we’re defining where the registry values live here: HKLM:\System\CurrentControlSet\Services\Dnscache\InterfaceSpecificParameters\
You can execute the PS script you create like this:
powershell.exe -ExecutionPolicy Bypass -File "C:\[path to PS script]\forcedns.ps1"
When successful, it should generate an output like this:
 
DohFlags     : 1
PSPath       : Microsoft.PowerShell.Core\Registry::HKEY_LOCAL_MACHINE\System\CurrentControlSet\Services\Dnscache\Interf
               aceSpecificParameters\{b8c2ef47-639d-4b00-96f4-b8e3c8a30618}\DohInterfaceSettings\Doh\185.228.168.10
PSParentPath : Microsoft.PowerShell.Core\Registry::HKEY_LOCAL_MACHINE\System\CurrentControlSet\Services\Dnscache\Interf
               aceSpecificParameters\{b8c2ef47-639d-4b00-96f4-b8e3c8a30618}\DohInterfaceSettings\Doh
PSChildName  : 185.228.168.10
PSDrive      : HKLM
PSProvider   : Microsoft.PowerShell.Core\Registry
 
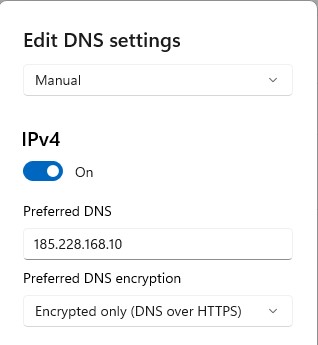
That should be it. If you open Settings and navigate to your DNS section it should look like this:

📦 Push DNS Logs to a Secure SIEM with Trunc
Trunc helps you forward CleanBrowsing DNS logs—and other system logs—to a secure, cloud-hosted SIEM. Get real-time visibility, threat detection, and compliance reporting without the overhead.
Explore Trunc →