Activating CleanBrowsing on your Linux is pretty simple. Our instructions here cover all distributions, including Ubuntu, RedHat, CentOS, etc.
🛡️ CleanBrowsing: Internet Safety Made Simple
Filter harmful websites, block adult content, and protect your entire network. All with fast, privacy-respecting DNS.
Start Filtering Here →Tech talk: CleanBrowsing is a DNS-based filter that prevents adult content from being loaded. It doesn’t require any software installation and can be easily enabled anywhere by switching your DNS servers to the ones we provide. We also offer Apps for the major devices in order to simplify your life.
Step 1: Overview
Linux keeps your Nameserver configuration stored at the file /etc/resolv.conf. It is used across all Linux distributions, so if you edit that file you will modify the default nameserver for the system. Any text editor is fine, as long as you have root (admin) permissions. Note that if you are using a DHCP client, it may try to override your changes with the ones by your DHCP server. You can try to edit the dhcp client configuration to prevent the change or set the resolv.conf file as immutable.
We found that no dhcp client configuration is the same, so setting the /etc/resolv.conf as immutable after you change is likely the easier route – with no side effects on any system we have done so.
Step 2: Change the DNS
The easiest way to change the file /etc/resolv.conf is via the terminal and using the echo command to add your nameservers.
If you’re running one of the newer versions of Linux (e.g., Ubuntu, Mint) you might run into a problem where changes to the resolv.conf are not recognized. This has to do with some funky changes they introduced. The quickest way around this is to remove the old resolv.conf file, and create a new one. Something as basic as this will work:
rm /etc/resolv.conf
touch /etc/resolv.conf
Then run:
sudo echo 'nameserver 185.228.168.168' > /etc/resolv.conf
That will force all your interfaces to go through CleanBrowsing (185.228.168.168). If it works, you won’t get any warning or error in the terminal.
As a bonus point, you can run the chattr command to set that file as immutable, so it can’t be modified any anyone else:
sudo chattr +i /etc/resolv.conf
That’s it. Your Linux server is configured.
Using Conman to Manage Interfaces
If you are using something like the conman daemon to manage your interfaces you might have to make additional changes to conman to account for your DNS updates. By design, conman has to be modified to read /etc/resolv.conf
This snippet was provided by a CleanBrowsing user, Craig. (source)
Modify /etc/init.d/conman
--- /etc/init.d/connman~1	2020-03-27 14:19:11.000000000 +0000
+++ /etc/init.d/connman	2020-04-24 22:27:20.707538355 +0100
@@ -19,13 +19,16 @@
 	. /etc/default/connman
 fi

-if [ "CONNMAN_RUNSTATEDIR_RESOLVCONF" != "no" ] ; then
-    mkdir -p /run/connman
-    ln -sf /run/connman/resolv.conf /etc/
+if [ -n $DAEMON_OPTS ]; then
+	echo $DAEMON_OPTS | grep -F -q 'nodnsproxy' ||
+	{
+		mkdir -p /run/connman/
+		ln -sf /run/connman/resolv.conf /etc/
+	}
 fi

 do_start() {
-	start-stop-daemon --start --oknodo --exec $DAEMON --$DAEMON_OPTS
+	start-stop-daemon --start --oknodo --exec $DAEMON -- $DAEMON_OPTS
 }

 do_stop() {
Then you can proceed with the following steps:
$ sudo /etc/init.d/connman stop
$ sudo rm /etc/resolv.conf
$ sudo echo 'nameserver 185.228.169.168' > /etc/resolv.conf
$ sudo echo 'nameserver 185.228.168.168' >> /etc/resolv.conf
$ sudo chattr +i /etc/resolv.conf
$ sudo /etc/init.d/networking restart
$ sudo /etc/init.d/connman start
While this does work, the system tray will show the wrong domain name servers.
Optional Step – Automate Conman to Account for Resolv.conf
Craig goes on to update conman further to automate the process above by modifying conman further:
This patch goes in this file /etc/init.d/connman (the following is a diff, shows what is removed, and what is added in it’s place:
--- connman~1	2020-03-27 14:19:11.000000000 +0000
+++ connman	2020-04-27 15:32:40.585655166 +0100
@@ -19,17 +19,29 @@
 	. /etc/default/connman
 fi

-if [ "CONNMAN_RUNSTATEDIR_RESOLVCONF" != "no" ] ; then
-    mkdir -p /run/connman
-    ln -sf /run/connman/resolv.conf /etc/
+DNS_PROXY='yes'
+if [ -n $DAEMON_OPTS ]; then
+	echo $DAEMON_OPTS | grep -F -q 'nodnsproxy' && DNS_PROXY='no'
 fi

 do_start() {
-	start-stop-daemon --start --oknodo --exec $DAEMON --$DAEMON_OPTS
+	if [ $DNS_PROXY = 'yes' ]; then
+		mkdir -p /run/connman/ || return
+		if [ -f /etc/resolv.conf ]; then
+			ln /etc/resolv.conf /etc/connman/
+		fi
+		ln -sf /run/connman/resolv.conf /etc/ || return
+	fi
+	start-stop-daemon --start --oknodo --exec $DAEMON -- $DAEMON_OPTS
 }

 do_stop() {
-	start-stop-daemon --stop --oknodo --quiet --exec $DAEMON
+	start-stop-daemon --stop --oknodo --quiet --exec $DAEMON || return
+	local _rc=$?
+	if [ $DNS_PROXY = 'yes' ]; then
+		mv /etc/connman/resolv.conf /etc/
+	fi
+	return $_rc
 }

 get_pid() {
Final Step: Verify Configuration
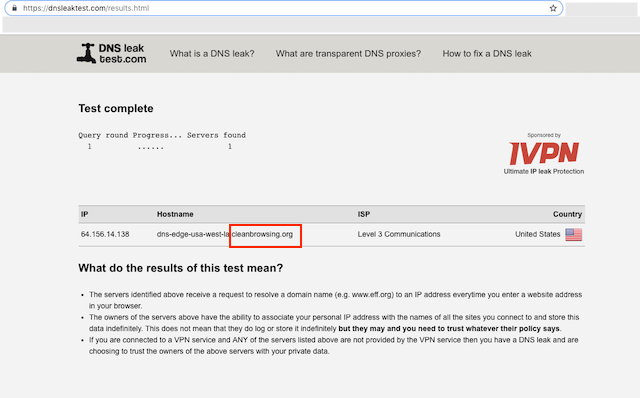
The final step is to verify the DNS configuration is working. You can use DNS Leak Test to help with this.

You will run the Standard Test. The output should show CleanBrowsing in the response.
It is advised to take the time to flush your DNS resolver cache on your local machine and browser caches to ensure that your new DNS configuration settings take affect.It can take 10 – 15 minutes for the change to take affect, be patient. The additional time is the time required for your computer DHCP Lease to get the new DNS. If you disable your Wifi and re-enable, it will force it right away (you can also reboot the router).
If you experience issues please visit our Common Questions and Troubleshooting Guide for more help.
📦 Push DNS Logs to a Secure SIEM with Trunc
Trunc helps you forward CleanBrowsing DNS logs—and other system logs—to a secure, cloud-hosted SIEM. Get real-time visibility, threat detection, and compliance reporting without the overhead.
Explore Trunc →