There may be instances where the Windows App does not work on your network or with your ISP. In these instances you will need to configure Windows manually using plaintext IPv4 and IPv6. This article will show you how to do this.
If working with a paid account, you can get the plaintext values in your account dashboard.
For the purposes of this article, we’ll use the Free Family values:
IPv4:
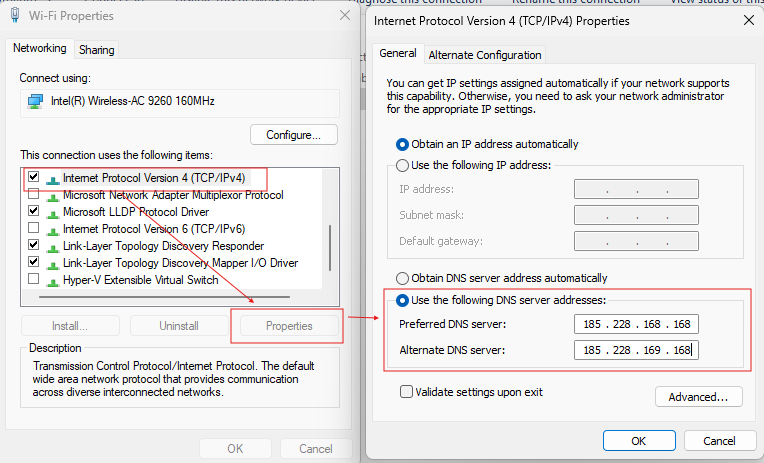
Primary: 185.228.168.168
Secondary: 185.228.169.168

IPv6:
Primary:2a0d:2a00:0001:0000:0000:0000:0000:0000
Secondary: 2a0d:2a00:0002:0000:0000:0000:0000:0000
Step 1: Navigate to Network Properties
There are several ways to open Network Properties, it doesn’t matter how you get there. If you’re novice, you can type in View Network Connections in your menu tool bar.
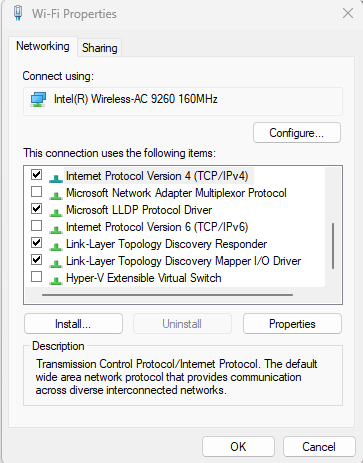
From there, click on the interface being used (i.e., Ethernet or WiFi). It would look something like this:

Step 2: Update IPv4 and IPv6 DNS Values
Using the values from your account, or those provided above, you’ll update the IPv4 and IPv6 values.
You will have to do IPv4 and IPv6 separately, but using the same technique.
Click the protocol version, example Internet Protocol Version 4 (TCP/IPv4), click Properties. This will open a new dialog, on this panel select Use the Following DNS Server Addresses.
Manually enter the values for Preferred and Alternative DNS servers as shown here:

Click OK
Repeat the steps for IPv6 using the IPv6 values respectively.
Step 3: Account for Dynamic Public IP Addresses
Public IP addresses can change, unless you have a static IP address issued by your ISP. This is especially important when using IPv4.
To address this, we have a dynamic Device URL that can be configured to keep public IP addresses active in our system. Please be sure to read this article to ensure you’re configured to account for this.
