Routers come in various shapes and sizes, and we provide individual step-by-step instructions for certain brands and models. However, due to the variety of models, we might not have instructions for every single one. This guide offers generic instructions that work for most brands. By following these steps, you will have a network fully protected and running CleanBrowsing.
Step 1: Login to Your Router’s Administrative Panel
First, access your router’s administrative panel. It’s generally located at the same IP address as your network gateway.
Common addresses include:
http://192.168.1.1
http://192.168.254.254
http://10.0.0.1
If these don’t work, check the back of your router for the login URL. On a Mac, you can find the network gateway IP address by opening the Terminal and typing:
netstat -nr | grep '^default'An example output is:
default 192.168.100.1 UGSc 82 0 en0On Windows, open the Command Prompt and type:
ipconfig | findstr /i "Gateway"This will display something like:
Default Gateway . . . . . . . . . : 192.168.100.1
Your router’s administrative panel would be at http://192.168.100.1. If you don’t know the password, it is usually on the back of the router.
Step 2: Configure Connection Settings
Next, locate the network connection settings in your router’s admin panel. This may be under “WAN Settings,” “Connection Settings,” “Internet,” or similar. Look for options to change the “DNS Server” or “DNS Name Server.” It should allow you to change DNS1 and DNS2 settings. Ignore options related to DynDNS (Dynamic DNS).
Change the Primary DNS Address to 185.228.168.168 and the Secondary DNS to 185.228.169.168. If you’re using a paid CleanBrowsing plan, use the IP addresses provided in your dashboard.
Step 3: Save Your Changes
After updating the DNS settings, click on “Apply” or “Save” to save your changes. It might take a few minutes for your computer to refresh the DHCP lease and get the new DNS settings. You can force this update by disabling and re-enabling your WiFi.
To test the new settings, visit badexample.com. You should see a “domain not found” error if everything is configured correctly.
By following these steps, you can ensure that your network is protected with CleanBrowsing DNS. For more detailed instructions for specific router models, check our router setup guide.
Final Step: Verify Configuration
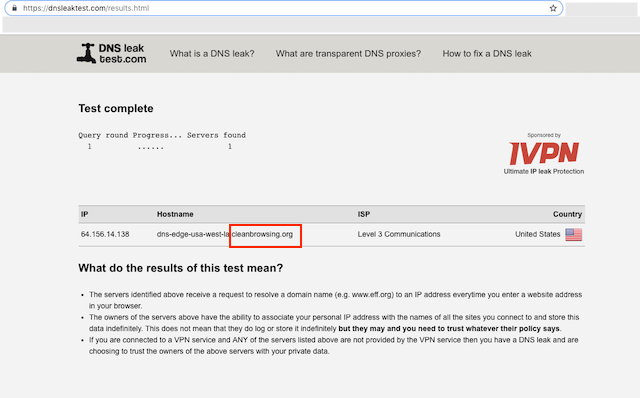
The final step is to verify the DNS configuration is working. You can use DNS Leak Test to help with this.

You will run the Standard Test. The output should show CleanBrowsing in the response.
It is advised to take the time to flush your DNS resolver cache on your local machine and browser caches to ensure that your new DNS configuration settings take affect.It can take 10 – 15 minutes for the change to take affect, be patient. The additional time is the time required for your computer DHCP Lease to get the new DNS. If you disable your Wifi and re-enable, it will force it right away (you can also reboot the router).
If you experience issues please visit our Common Questions and Troubleshooting Guide for more help.
