Changing your DNS Nameserver can be easily done via the command line interface. Learn how to do it on Windows, Mac and Linux.
🛡️ CleanBrowsing: Internet Safety Made Simple
Filter harmful websites, block adult content, and protect your entire network. All with fast, privacy-respecting DNS.
Start Filtering Here →Changing Nameservers via the command line
Changing nameservers can be a pain on some devices and require multiple clicks through a user interface. On Windows 10, for example, we counted more than 10 different clicks and screens just to do a simple change. However, this process can be a lot faster and easier via the command line interface (called terminal on Linux and Macs) or the command prompt on Windows.
In this guide we will show you how to change the nameservers with one simple command that you can copy/paste into the terminal. We will be using the CleanBrowsing DNS IP address on our examples (185.228.168.168), which we recommend for children devices, schools or any device where you may need to restrict access to adult content.
However, if you are doing the change on a device where you do not need any filtering, you can just replace the 185.228.168.168 IP address for the DNS server of your choice (8.8.8.8 for Google DNS is a common one).
MacOS
Macs come with the networksetup command line tool that allows you to configure the network settings. It can also be used to change the nameservers by using it with the -setdnsservers flag. Open your terminal by going to the spotlight and typing “terminal” and run:
sudo networksetup -setdnsservers Wi-Fi 185.228.168.168That will force the Wi-Fi to go through CleanBrowsing (185.228.168.168). If it works, you won’t get any warning or error in the terminal and you are all set. As a bonus point, you can run the chflags command to block anyone from changing the nameserver via the graphical user interface:
sudo chflags schg /Library/Preferences/SystemConfiguration/preferences.plistLinux
Linux keeps your Nameserver configuration at the file /etc/resolv.conf. That makes it very easy to modify by editing that file. A simple way to make a change is by running the command echo to clear the file and add your new entry in there:
sudo echo 'nameserver 185.228.168.168' > /etc/resolv.confThat will force all your interfaces to go through CleanBrowsing (185.228.168.168). If it works, you won’t get any warning or error in the terminal.
As a bonus point, you can run the chattr command to set that file as immutable, so it can’t be modified any anyone else:
sudo chattr +i /etc/resolv.confWindows
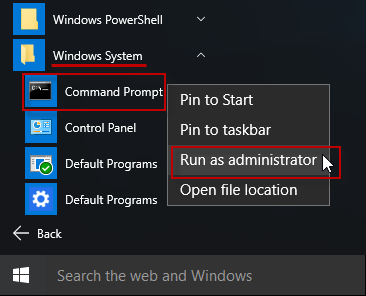
Windows Vista, 7, 8, 10, 2008, 2012 and 2016 come with the netsh command line tool. It does a lot of things, including changing your DNS nameserver. To get access to it, your first need to open the command prompt by going to the sidebar and starting it choosing the command prompt and “Run as Administrator”
:
Once you are in the command prompt, just paste this command in there:
netsh interface ipv4 set dns "Wi-Fi" static 185.228.168.168 primaryThat will force Wi-Fi to go through CleanBrowsing (185.228.168.168). If it works, you won’t get any warning or error in the command prompt. If you get a big output of errors, it means you do not have the “Wi-fi” interface set. It could also be called: “Wireless Network Connection”, so try with it in case the previous command failed:
netsh interface ipv4 set dns "Wireless Network Connection" static 185.228.168.168 primary
If both failed, try running the command “netsh interface ip show config” to get your list of interfaces.
🚀 Power Your Web Infrastructure with NOC
NOC combines authoritative DNS, a global CDN, and an intelligent WAF into one high-performance platform. Protect your sites, reduce latency, and gain full control over your delivery stack.
Visit NOC →