When working with our service tracking the public IP is important, without it, the system doesn’t know where to apply the filtering rules. This is especially true when using IPv4.
To help account for this, we created a series of articles that guide you through the process of keeping your public IP updated in your dashboard using our dynamic device feature:
This, however, can be problematic when a device is constantly moving and the public IP of the network continues to change. In a perfect world, the public IP change would happen in the router, but our dynamic device option is not available in routers.
If your router does have a built-in Dynamic DNS feature, this guide is for you. If your router supports another service, here is another option:
This does not apply to the Free plans.
MacOS
Before you configure our Dynamic Device, note that our dashboard supports Dynamic DNS (DynDNS and similar services) out of the box, so if you use one of them, all you have to do is add your DynDNS domain on the “Your Network” settings page.
If you don’t have a DynDNS domain, you can use our own Generic Device config to keep your IP address in sync (go to Step 1 bellow).
Step 1: Add new Device to Dynamic Devices
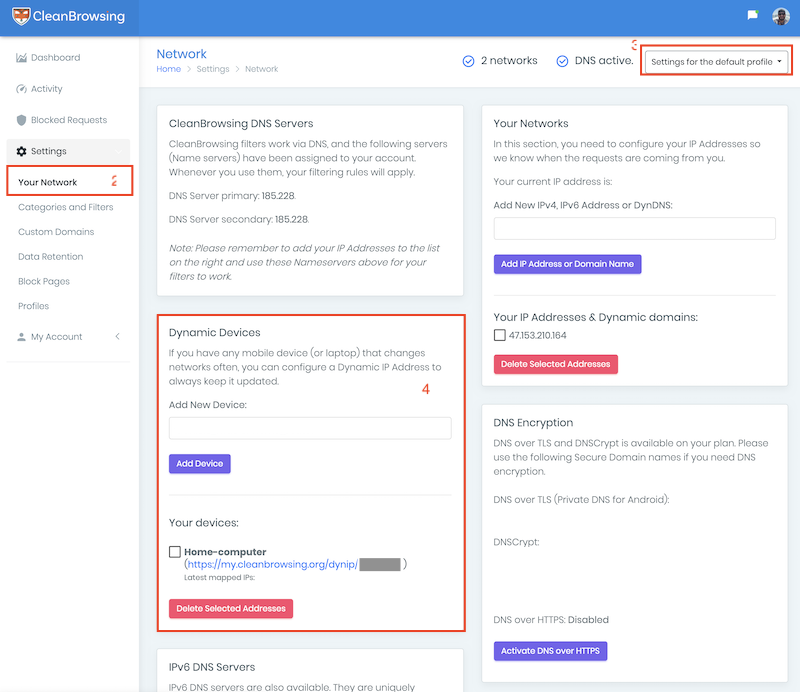
Inside the CleanBrowsing application you want to navigate to the settings page. On this page you will find a panel titled, Dynamic Devices.
Configuring
- Under Settings
- Click on Your Network
- Select the right Profile
- Enter a name for the device

Add the name that will make sense later. For instance, in this example, I chose Home Mac. This is important because you want to be able to which device it is. It’s also good to be mindful if you’re trying to account for a dynamic public IP on your home network or a dynamic public IP on a device that travels.
Things to Consider
If this is for your local network, deploy this on a device that is stationary in the network. For instance, my house changes public IP from time to time. So I configure this on a Home Computer. This ensures that if I leave the house with my computer, and the IP changes I don’t lose the address applied to the main profile.
If you are going to use this on a mobile computer, a laptop that you travel with, it’s best to create a new profile, then add the device to the specific profile.
This new domain will provide you a unique code. This code will be used in the next steps. What we’re doing here is creating a unique domain that will capture the public IP of that device at a set frequency. That is why it’s so important to apply it to a stationary device in your network.
Step 2: Configure a Dynamic Device
Depending on your device, you will want to set up a recurring task to ping the URL provided above. If you are using a NIX based machine (e.g., Linux) you can use a cron job (works on MAC as well). A cron job will allow you to set up scheduled events
Open the cron job via your terminal application. The -e option allows you to edit the cron file.
$ crontab -eNow paste the following command, updating only the MYCODE section:
*/2 * * * * curl https://my.cleanbrowsing.org/dynip/MYCODEExit the editor. That’s it! This will automatically update your IP inside your profile.
