Over the past couple years we have been working hand in hand with organizations and individuals alike to help them switch their DNS from other providers to ours, CleanBrowsing. In the process, we have noticed a disturbing trend with some ISP’s where they do not allow DNS to be changed on their routers.
This means if you want to change your DNS to use a provider that a) ensures your security, b) never shares or stores your data, or c) allows you to create your own safe browsing experience, you can’t.
🛡️ CleanBrowsing: Internet Safety Made Simple
Filter harmful websites, block adult content, and protect your entire network. All with fast, privacy-respecting DNS.
Start Filtering Here →The most prominent ISP’s in the US to do this are AT&T and Comcast on a few of their routers.
ISP’s Want Your DNS Traffic
The Domain Name System (DNS) is like your central nervous system, it helps direct traffic; it’s the translation layer, it tells your browsers that “cleanbrowsing.org” corresponds to “205.67.89.56”. The latter being the address of the domain, cleanbrowsing.org, telling everyone where the server is located. This is how your browser knows what to show you when you make the request (i.e., type cleanbrowsing.org in your browser).
What this also means is that anyone that owns DNS has the ability to see every request you make. From those requests, you’re able to decipher a lot about what a user is doing, what they like, what they might like, and the list goes on.
ISP’s capitalize on DNS traffic in two ways: DNS Hijacking and Router limitations.
This post will focus on Router limitations and what you can do to retake control of what happens on your network.
Retake Control of Your DNS
Large enterprises have people with the expertise required to overcome these challenges, so these instructions will be specific to home users, and organizations that don’t have that knowledge or resources.
Step 1 – Verify DNS Changes are Allowed
Tech talk: To understand this section, acknowledge that editing the DNS on your router is not the same as your network allowing DNS to be changed. You can have a network that allows DNS to be changed, but a router that doesn’t allow it. The following section will verify that the network allows the change, independent of the router itself. This is important because we want to make sure the network allows it before going to Step 2.
Before you go any further, you want to verify that your ISP will allow DNS to be changed on the network. Note that I’m not referring to the router itself.
You can do this using a very simple test. This can be done via your command prompt or terminal applications:
% nslookup badexample.com 185.228.168.168
    Server:        185.228.168.168
    Address:    185.228.168.168#53

    ** server can't find badexample.com: NXDOMAIN
This command is querying one of the CleanBrowsing servers directly (One of our Free filters) and asking it to lookup a specific domain (i.e., badexample.com). We block this domain, and provide the NXDOMAIN or REFUSED response.
So in this instance, you can see that the network I am on is allowing DNS to be changed. It tells you that you can change DNS on the network.
Step 2 – Create A Separate Network
This might sound intimidating, but don’t let it overwhelm you. To do this, however, is going to require you to purchase a third-party router. You can get them at a local electronics store (e.g., Best Buy, Fry’s, etc…).
Most NetGear, Orbi, Linksys, Google, and Eero routers allow you to change DNS settings, so anything that has the coverage you need for your home will do the trick.
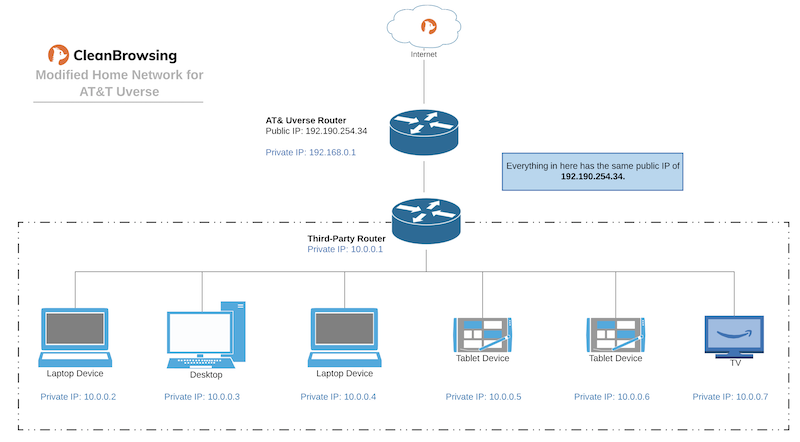
All you are going to do is plug the router into your ISP’s router. This will create a new network, known as a subnet, off your ISP’s router. Here is a diagram of what it would look like:

Doing this will allow you to retake control of your DNS. This will then allow you to retake control of who has access to your data, while also empowering you to create the browsing experience you want on your own network.
Notice: Accounting for an Existing Network
The biggest concern we get from users is usually about the existing devices on the network. Specifically concerned about having to update all the machines with a new network (i.e., SSID). Makes complete sense.
To account for this, we always recommend setting the SSID (i.e., network name) for the new router to be the same as the existing one, with the same password. Yes, this means you’ll have to disable it on the main router for a few minutes as you switch, but that will be a lot easier in the long run then having to do every device individually (should take no more than a few minutes).
Define the Browsing Experience You Want
There is nothing more frustrating than paying for a service that takes your control, especially when it’s something as personal, sensitive, as your online behaviors. The steps above will help you retake control, ensuring that you have the ability to control what happens on your network without having to worry about what ISP’s are doing with your information.
Tech Note: This configuration might cause problems if you host public-facing websites, or are heavily reliant on online gaming or VOIP. Another option might be to use the “modem mode” or “bridge mode” option on the main ISP router. The specific option is dependent on what the ISP provides.
📦 Push DNS Logs to a Secure SIEM with Trunc
Trunc helps you forward CleanBrowsing DNS logs—and other system logs—to a secure, cloud-hosted SIEM. Get real-time visibility, threat detection, and compliance reporting without the overhead.
Explore Trunc →