
Adding CleanBrowsing to XBox, Playstation, and Wii U.
Playstation 4:
From the PS4 Menu, scroll right to Settings > Network > Set Up Internet Connection > Select either Wi-Fi or LAN cable (Wired)
- Wi-Fi: Custom > Select Network > Enter Password (automatically saved if you are already using this network) > IP Address Settings (automatic) > DHCP Host Name (Do Not Use) > DNS Settings (Manual)
- LAN (Wired): Custom > IP Address Settings (Automatic) > DHCP Host Name (Do Not Use) > DNS Settings (Manual)
The CleanBrowsing Family IP’s are:
- 185.228.169.168
- 185.228.168.168
Note: If you have a paid plan use the DNS IPs provided in your account.
Next > MTU Settings (Automatic) > Proxy Server (Do Not Use) > Test Internet Connection.
Xbox One:
From the Xbox One home screen, go to Settings > Network > Advanced settings > DNS settings > Manual. (If Settings doesn’t appear on the home screen, select My Games & Apps, then Settings.)
The CleanBrowsing Family IP’s are:
- 185.228.169.168
- 185.228.168.168
Note: If you have a paid plan use the DNS IPs provided in your account.
Wii U:
- From the Wii U Menu, select “System Settings.”
- Using the Left Stick, select the “Internet” icon and press the A Button.
- Tap “Connect to the Internet.”
- Press the X Button or tap “Connections” in the top-right corner.
- Select the connection you wish to configure.
- Tap “Change Settings.”
- Tap the arrow on the right and select “DNS.”
- Tap “Don’t Auto-Obtain” and enter in the DNS info.
- Then tap “OK” to return to the DNS screen.
- Tap “Confirm” to return to the manual settings screen.
The CleanBrowsing Family IP’s are:
- 185.228.169.168
- 185.228.168.168
Note: If you have a paid plan use the DNS IPs provided in your account.
Final Step: Verify Configuration
The final step is to verify the DNS configuration is working. You can use DNS Leak Test to help with this.
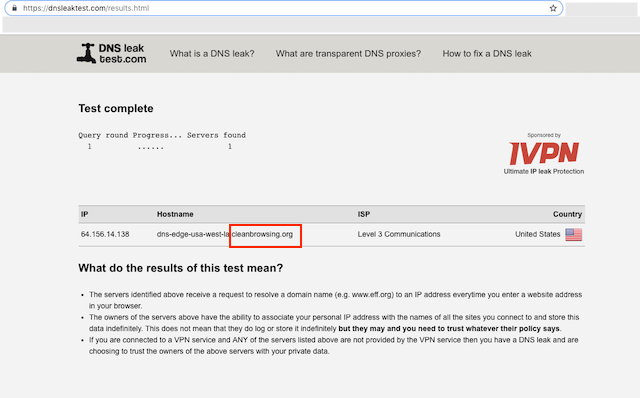
You will run the Standard Test. The output should show CleanBrowsing in the response.
It is advised to take the time to flush your DNS resolver cache on your local machine and browser caches to ensure that your new DNS configuration settings take affect.It can take 10 – 15 minutes for the change to take affect, be patient. The additional time is the time required for your computer DHCP Lease to get the new DNS. If you disable your Wifi and re-enable, it will force it right away (you can also reboot the router).
If you experience issues please visit our Common Questions and Troubleshooting Guide for more help.